|
|
Technology lessons, guides, rubrics and DVD
yearbook how-to’s for grades K-8 by David Hall |

|
How-To Create Movies with
Windows Movie Maker Windows Movie Maker Essentials: Windows Movie Maker (WMM) can be used to compress
a raw movie clip to a tenth or even less of its original size. WMM is especially good at producing videos
with good image quality at reasonable file sizes. Windows Movie Maker can be used to thoroughly
edit raw movie clips, adding: still images, sounds, music, transitions,
effects titles and credits. You can
spend days sorting through several hours of footage which can be reduced to a
high quality story. Critical
Concepts: * Always
begin by saving a Project File (File
> Save Project as…). A Project
File will only open in Windows Movie Maker on the computer (or network account) that created
it. This is the only way that you can
save your editing work; you may want to make changes at a later point. * The main purpose of Windows Movie Maker is
used to create/publish shareable files that are compatible with Windows Media
Player (and some other players). Windows Media Player compatible files
cannot be edited to the full extent as a Project File, but can be played on
almost any computer.
* Organize your movie/video files in the
Windows default folder: Videos (Vista) or My Videos (XP). Likewise, organize all still images in
Pictures/My Pictures and sound files in Music/My Music. * Once you begin a project, never change filenames, folder names
or file locations of associated files and folders! (WMM
will no longer be able to find the files to make the movie.) Import
Video from Camera/Camcorder Flash Memory Cameras - Almost all compact digital still cameras use a
version of flash memory to store images and movies, some video cameras also
use flash memory. Downloading video
clips from a digital camera is the same process as downloading still
pictures. Typically, the USB cord must
be connected from the camera to the computer, the camera must be on and in
view mode. Follow the prompts to “Open
Folder to View Files”. If you are
downloading to your own computer (or
account), I HIGHLY recommend
cutting (Ctrl-X) files instead of
copying them. This will ensure that all
of your camera’s memory is available and you will never be confused as to
which files have been downloaded.
Being systematic will save you from certain headaches later on. (Memory
card readers can be used in the same fashion.) Hard Drive Video-Cameras - Hard Drive Video-Cameras probably download in
a similar manner as flash memory cameras.
(I’ve never used one) DVD Video-Cameras - Hard Drive Video-Cameras create mini DVDs that can be loaded
into a PC or TV DVD drive/player. DVD
cameras write in a .VOB format that cannot be read by WMM, however. Digital Tape Video-Cameras – Most video cameras/camcorders use a digital
tape such as the popular Mini-DV format.
Often video footage must be accessed with a FireWire (IEE 1334) and a
special program such as Windows Movie Maker to download the footage. Many Videotape Video-Cameras do not come
with a FireWire and many older PCs do not have IEE 1334 (FireWire) ports. Almost
any older computer will accept an IEE 1334 (FireWire) card, however.
It is wise to plug in the video camera’s power supply before beginning
a download/capture since a capture can take a long time. Compatible File
Formats - Unfortunately,
many video file formats are not recognized by Windows Movie Maker. One of the most common video formats is
.AVI, which is compatible with WMM.
Apple’s QuickTime is probably the other most common format, but it is
NOT compatible with WMM. There are
hundreds of programs that can convert the dozens of available formats, but
this can be a serious time consuming hassle that typically produces a
noticeable decreases in image and sound quality and a significant increase in
file size. Cameras that shoot in
alternative formats sometimes come with editing programs that have many
features similar to those in WMM; but usually are not as good as WMM. Before purchasing a camera or camcorder be
sure that its movie format is compatible with WMM! WMM compatible video files: .asf, .avi, .m1v, .mp2,
.mp2v, .mpe, .mpeg, .mpg, .mpv2, .wm, and .wmv WMM compatible audio files: .aif, .aifc, .aiff .asf, .au,
.mp2, .mp3, .mpa, .snd, .wav, and .wma WMM compatible picture files: .bmp, .dib, .emf, .gif, .jfif, .jpe, .jpeg, .jpg, .png, .tif,
.tiff, and .wmf The most basic tasks in
Windows Movie Maker begin in the task pane on the left, under the headings: Import, Edit and Publish to (In XP the headings read: Capture Video, Edit Movie & Finish
Movie but have the same sub-headings). These tasks are pretty much “what you see
is what you get/drag and drop”. For
example: if you want to use a video clip on your computer, click > Import
Videos, navigate to the file, select it and click > Import. Below are screenshots of Windows Movie
Maker (Vista) showing the Timeline and Storyboard layouts. The XP
version of Windows Movie Maker is very similar.
Timeline Layout Storyboard Layout Some of the most useful, but
not necessarily obvious features of Windows Movie Maker: 1. Tools > Options > Advanced: Adjust
default transition duration and still picture duration. 2. Zoom & Unzoom (Time): Zooming in allows you to view and trim clips precisely (Timeline layout only). 3. Timeline & Storyboard toggle. Volume levels can also be adjusted here as
well as narration. (XP similar) 4. Expand basic tracks to also show audio from
video as well as transitions (Timeline
layout only). 5. Time: Shows current position / overall
video length. 6. Current Position: Drag to any position on
the timeline. (Useful with Split and Zoom) 7. Split: Splits a clip at the current
position marker. Portions of the clip
can be rearranged, deleted or copied. 8. Clip Trim Tabs (black triangles on selected clip): Click and drag either end of
a clip to trim it. Publish
Video Files (Publish to – this computer
{Vista}, Finish Movie – save to my computer {XP}) The first time you
publish/finish a movie with Windows Movie Maker you may notice that the
default folder that Windows will save to is the “Public folder”; this is a
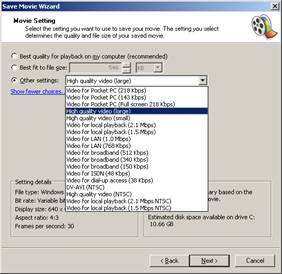
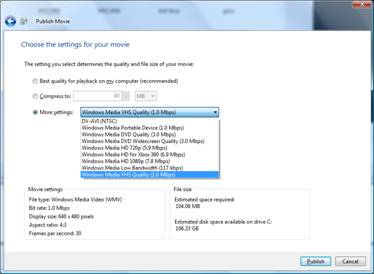
silly folder, click Browse and change it to your Videos/My Videos folder. The next dialog box is very different
between XP and Vista.
Note that the XP screenshot is
on the left, Vista is on the right.
Both dialog boxes juggle video display size, frames per second and
image quality against file size.
Before making a quality/size setting selection, it is important to
consider how the movie will be used or shared. If the movie is to be burned to a DVD or
stored on the computer’s hard drive, you probably will not want to sacrifice
quality for a smaller file size. If
the video is to be shared over the Internet, however, file size must be
considered. Note that both dialog
boxes show details about the settings in the lower left hand corner and
estimated file size in the lower right.
Your movie will not gain quality by selecting a larger display size or
frame rate than the original raw footage.
If you select a display size of 640 X 480 for a clip that was
originally shot at 320 X 240, it will gain much in file size, but not gain
quality. Generally, 30 frames per
second is considered the standard frame rate.
Some cameras may shoot at slower rates to reduce file size. 30 FPS literally has twice as much image
data as 15 FPS. Image sharpness and
quality can also be sacrificed to save on file size. Broadband download times are usually
reasonable for short videos that are at 640X480 at 30 FPS or 720X480 at 30
FPS. Longer videos are probably better
off at 320x240 resolution. YouTube
converts uploaded videos to 320X240 resolution at 30 FPS. Often, larger
display size videos that have been converted down by YouTube will appear
sharper than those uploaded in its native 320x240 resolution. Always look at the movie setting details and estimated file
size. If you are on an XP computer, I
recommend High quality video (Large) for movies shot at 640X480 and High
quality video (Small) for movies shot at 320x240. Both of my cameras shoot at 640X480 so I generally
select Windows Media VHS Quality (1.0 Mbps) on my Vista PC. It may be worth your time to experiment
with different settings so that you may compare quality versus file size. Filming
Movies – Two Essential Tools Light -
Whenever possible, shoot outside in daylight, near a window or with a few
hundred watts of light. The color in
your videos will be much brighter and the image will be much sharper. Even expensive professional equipment
requires bright studio lights. Tripods
– A high-end video-camera in the hands of and expert will not produce an
image as steady as one shot by a novice, with a cheap camera mounted on a
cheap tripod. Get a tripod! Clips shot from tripods also have many
advantages during editing. Use your
tripod! |
|
These screen-shot movie guides below may help guide you: |
|
|
Basic |
Part 1 (3 minutes - 7 MB) Import videos, Storyboard/Timeline,
expand tracks, zoom, cut clip length, save project. |
|
Basic |
Part
2 (3 minutes - 10 MB) Effects,
Transitions & Titles. |
|
Basic |
Part 3 (2 minutes – 3 MB)
Publish a movie with Windows Movie Maker. |
|
Advanced |
Part 4 (2 minutes – 3.5 MB) Dub the sound track from one video track over another
video track. |
|
Advanced |
Part 5 (1.5 minutes – 4.8 MB)
Add a downloaded .MP3 or .WAV sound file to your movie. |
|
Advanced |
Part 6 (1 minute – 2.5 MB)
Narrate a movie. |