|
|
Technology
lessons, guides, rubrics and DVD yearbook how-to’s for grades K-8 by David
Hall |
|||||||||||||||||||||||||||||||||||||||||||
|
|
|
|||||||||||||||||||||||||||||||||||||||||||
|
Browser Based Mixed
Media DVD Yearbook - Guide for Administrators
The
Browser Based Mixed Media DVD Yearbook is essentially a website that has been
burned to a DVD. It can be viewed
directly from the DVD drive or the contents may be copied to a hard drive for
faster access. That’s it! The technical requirements and conventions
of building a DVD website are much simpler and forgiving than those of an
Internet website. Distribution of Content and Ownership For the
sake of privacy and safety, a DVD yearbook should be viewed by school
families on their home computers. No
content should be distributed over the Internet. Purchasing a DVD yearbook entitles a family
to copy the DVD contents to their family’s household PCs and laptops. All family members and future descendants
are entitled to own copies. Families
are encouraged to make back-ups on any medium they may prefer. How awesome is that! A Browser
Based Mixed Media DVD Yearbook is not as compatible as a book. To view the DVD yearbook users must have a
computer, laptop or Mac with a working DVD drive and an up to date browser
(Internet Explorer, Firefox, Opera, Google Chrome or Safari, etc) and a an up
to date media player (Windows Media Player, VLC Media Player, QuickTime,
Media Player Classic. Etc). When
opened the yearbook webpages will play in the default browser. Movies and .wmv slideshows will play in the
default browser. PowerPoint or Flash
files may also be included and will obviously need these programs. Any
computer with a DVD drive that is capable of surfing the Internet and viewing
most media should have no trouble playing Browser Based Mixed Media DVD
Yearbook. I tested our 07-08 yearbook
on several computers with a variety of browsers and had virtually no
problems. The one exception was my
current, best home PC which would not play movies from Internet
Explorer. I gave up on Internet
Explorer soon after I built the PC, however, because it just will not work
properly on this one machine. The
other four browsers play the yearbook without issues. I did
have some families report that they could not get the yearbook to run. In virtually every case their PCs were very
old and/or had not been updated in years.
The good news is that new computers, operating systems and software
generally gets better and faster and are have less compatibility problems
that could prevent playing such files.
I seriously doubt that a new computer would have trouble playing a
Browser Based Mixed Media DVD Yearbook.
These families will eventually get new computers. Anyone can Contribute Students,
parents and teachers can make pages, movies or slideshows about any school
related topic. Topics may include:
school performances, clubs, events, graduations, sports, scouts, examples of
exceptional student work, etc. Each
student in has their own webpage. The
first example of a browser-based DVD yearbook included over 500 pages and
nine hours of video and slideshows. Student Made Personal
Pages I have my
students in grades two through eight make their own webpage (during computer
class) that includes their photo and interesting information about
themselves. Other files such as mp3
recordings, outstanding work or movie clips may be included as well. Kindergarten and first grade students have
pages made for them by their “Big Buddy” upperclassmen in grades five and
six. I guide my second and third graders
through the process, step by step. The
older students use my webpage
guides and I offer assistance as needed. I view these pages as the single most
important feature in the yearbook. Two
Examples: My school
has a general school policy of not exposing information and images of our students
on the Internet. I don’t mind showing
my daughters’ pages from 2007-2008 however:
Svea was in the second grade last
year and made this page. Brigitta was in kindergarten last
year. I initially made a page about
her to use as an example for my classes; I wanted to show how photos from
home could be included. Her sixth
grade big buddy interviewed her and wrote her bio. Both
pages are typical of their grade level.
Most students did not include pictures or movie clips from home,
however. The Administrator Whoever assembles the final product will need
to have a firm grasp on file management basics. HTML/webpage experience
is a plus, but certainly can be learned as they go. The most difficult
aspect is the quantity of work; technically it is all very simple, however. * The jobs of the yearbook administrator may
be divided among several people. One
person may handle sales, receipts and DVD distribution. Another person may volunteer to burn, label
and case the DVDs. This year I have
recruited one very capable eighth grade student to co-administrate
sports. There are many sports teams at
each grade level; last year I did a poor job of recruiting media on our
sports teams and they were woefully under-represented. I was too overloaded with everything else
to track down people to submit sports photos and create media. Boy and Girl Scouts could also use a
co-administrator. Plan the DVD yearbook. Create a list of essential and optional
topics to be covered as well as a set of deadlines. Allocate disk space per topic to fit within a
4.7 GB total. (Or possibly 8.5 GB for
double layer DVDs; I’m not sure how compatible these are, however.) Create and make available topic sign-up
lists. I have ours taped to a wall in
our computer lab. Here is an example
to use as a starting point: topics_sign_up.doc (Word 97-2003 Document) Recruit and organize students, school staff,
coaches and parents to become yearbook staff members/contributors. Plan a distribution date, allow enough time
to compile, complete and burn the final product. Our paper bound yearbook deadline is in the
beginning of March and the book is distributed weeks before the end of the
school year. We wanted our DVD
yearbook to cover the important end of the year events as well so our
distribution date is in the summer. Provide a method or server folder where
pictures and video clips can be shared and accessed by yearbook staff
members. Collect and organize digital copies of
professional school portraits. Make duplicates of medium and small sizes. Our professional school photographer has
willingly shared digital copies for this project. Teach students,
staff and parents how to make
simple web pages, movies and slideshows.
Host meetings and teaching sessions as needed. Guide all students through making their own
personal pages (during computer class).
Have upperclassmen make pages for kindergarten and first grade
students. Here are sample interview
questions: k1_interview_questions.doc (Word 97-2003 Document) Here are webpage guides for students. Advertise and sell copies of the yearbook on
a pre-order basis, collect and record all fees. Gather completed files. Keep back-up originals of all files. Compress files.
Rename compressed files to fit a filename convention (I keep filenames
brief and use lower case letters, numbers and underscore only). Organize files within topic subfolders. Create a main index page with hyperlinks to
all topic files. Here is an example to
use as a starting point: index.doc (Word 97-2003 Document) Create a picture-name class grid template
page. Here is an example to use as a
starting point: kb.doc (Word 97-2003 Document) From the template, create a picture-name
class grid page for each class, insert small portraits and type students’
names. Hyperlink students’ names
and/or pictures’ on each class grid page to each students’ personal web page. Create a Read-Me file. Include both a printed copy with the DVD
and an electronic file within the DVD.
Here is an example to use as a starting point: read_me.doc (Word 97-2003 Document) Create an installation file. It is surprising how many people cannot
copy a folder from a DVD and paste it onto their computer; even with written
instructions included on the Read-Me file.
I’ve looked into creating an auto-install file, but after one search I
didn’t find a free, easy to use program that would do what I want. Ideally I would like a file that would
check the PC’s hard drive to ensure that there is plenty of room, then copy
the DVD contents to the C:\Program Files folder and finally send a shortcut
to the desktop. It should also offer
to “Open folder to view files” and “Play now” which would open the yearbook
index in the default browser. Until
then, here is a “How-to
copy and paste the DVD Yearbook” video guide. Proofread.
One word, yet the most time consuming process of all. Last year my wife spent dozens of hours
proofreading the student’s personal pages for content, grammar and
spelling. This was a massive
chore. This year I plan on printing
the student pages in class and sending them home to be proofread by their
parents. The students will then make
corrections based on the notes from their parents. The pages will still have to be proofread,
but it should be much easier. Test all hyperlinks. A close second as far as time consumption
goes. This year I plan on checking
student’s hyperlinks in class. All
students have at least one link, from their 240 x 300 portrait on their page
to their 600 x 750 Jpeg within their folder.
Burn a master copy of the DVD yearbook. Burn or hire out the duplication of the
DVDs. Distribute DVDs. Required & Recommended Software: Microsoft Word (any version) as an HTML editor. Any
HTML editor may be used or a staff may use a mixture of editors. I recommend Word because it is readily
available, people are familiar with it and it is an easy to learn What-You-See-Is-What-You-Get program (for the most part). Although I use FrontPage for my other
sites, I used Word on this page and all other pages on this site. I find it so easy to use. Windows Movie Maker (any version). Any movie editing program that
can produce Windows Media Audio/Video files may be used or a staff may use a
mixture of programs. Windows Movie
Maker is a standard Windows program, is easy to use and does an excellent
job. Microsoft Photo Story 3 for WMV slideshows. This program does not come with Windows, but is a free download
for any Windows PC. Windows Movie Maker also can make WMV slideshows,
but Photo Story 3 does a much better job and has significantly smaller file
sizes and sharper images. FastStone Photo Resizer - I’m sure there are other programs that can
batch-resize images, but FastStone works very well and
is free! Our professional portraits
were given to us in 600 x 750 pixels.
I used Fastone Photo Resizer to make duplicates at 240 x 300 and 80 x
100. Each batch of nearly 500 images
only took a few minutes. authorGEN/authorPOINT Lite - Free! Converts PowerPoint presentations to
flash with amazing compression. Other
than burning the DVDs, all labor involved should be voluntary/free. The first
year that we produced a DVD yearbook we charged $5 per DVD and used almost all
of the money to hire out the burning.
We also gave free copies of the yearbook to our faculty and staff; the
cost of these DVDs was covered by the DVDs that we sold. I think we had 200 copies burned for about
$500; we supplied the cases. While
shopping around I found that professional duplicating companies had no idea
what I was talking about when I described what I wanted duplicated; this is a
brand new concept after all. They tend
to set their fees based on video length since that’s about 99% of what they
duplicate. Refer to your job as 4.7 GB
of “data” when inquiring about fees. At the low end, the minimum cost to produce browser
based DVD yearbooks would be the cost of blank DVDs, jewel cases (or sleeves)
and possibly labels. Regular computers
with DVD burners may do the job; our school’s DVD burners are very finicky
and unreliable. We have contemplated
purchasing a DVD duplicator. My
research shows that a $300 duplicator can burn two copies of a DVD in seven
minutes. Labels
are another issue. Professionals have
labeling machines that print directly on the top of the disk; these machines
are more expensive than the duplicators, however. They also may require special disks with a
white top surface. Based on my experience,
paper printed labels are a risky endeavor; if off center the slightest degree
they may not work. LightScribe disks
are a possibility but the LightScribe process can also be time consuming and
blank LightScribe disks are very expensive.
Custom stamps are reasonably priced and may be the most practical
option. I just re-wetted a 10 year old
ink pad with water and stamped a T-Rex onto a DVD top surface. It worked quite well and was resistant to
smearing after it had thoroughly dried. Compressing
files is absolutely essential to make hundreds of pages, thousands of
pictures and hours of movies fit onto a DVD.
Note that a DVD will only hold about 45 minutes of raw 640 X 480 .avi
video footage. Collect
webpages, movies and slideshows in high quality/large file size. Encourage staff to use Microsoft’s free Photo Story 3 program for making
slideshows. Movies should be received
at 640x480 resolutions, preferably in the 1.5 to 3 Mbps bandwidth range. Once you have collected all (or nearly all)
files, reevaluate and divide the allocated space among your movies and
slideshows. Compress files based on
quality, importance, entertainment value and length. Resave under your file naming
convention. Always save the originals
in case something goes wrong! Compressing Movies & Mbps
Vs MBps Windows
Movie Maker comes with nearly all versions of Windows and does an excellent
job of compressing movies. Under
“Publish to > This Computer” select “Compress to:” and select a desired
resolution and bit rate. Short movies
may deserve to retain 640x480 resolution at 1 to 1.5 Mbps. Long or low quality/poorly lit movies may
be compressed to 320x240 ~500 Kbps resolution. Some files may have dull video with good
audio and may be compressed even further.
Note that YouTube’s standard quality is only 320x240 res at 330
Kbps. At this resolution and bit rate
over 30 hours of movie footage would fit onto a DVD! Mbps Vs MBps: When considering data rates, I’ve made the
mistake of not noticing that the b in Mbps is not a capital B. This means that the standard format for
referring to video data rates is in Megabits per
second or Kilobits per second.
Eight bits per byte means
that an eight second video recorded at 1.0 Mbps will be approximately one
Megabyte. Compressing Photo Story 3
Slideshow Files If
yearbook staff submit slideshows that were created with Photo Story 3, I
strongly recommend having them submit the Photo Story 3 Project File (wp3) files and not the
Windows Media Video (.wmv) files. The
reason behind this is that Photo Story 3 does a fantastic job of compressing
slideshows to .wmv files. Windows
Movie Maker does a god job compressing videos, but all of the high quality
VS. small file size will be lost when a published Photo Story 3 file is
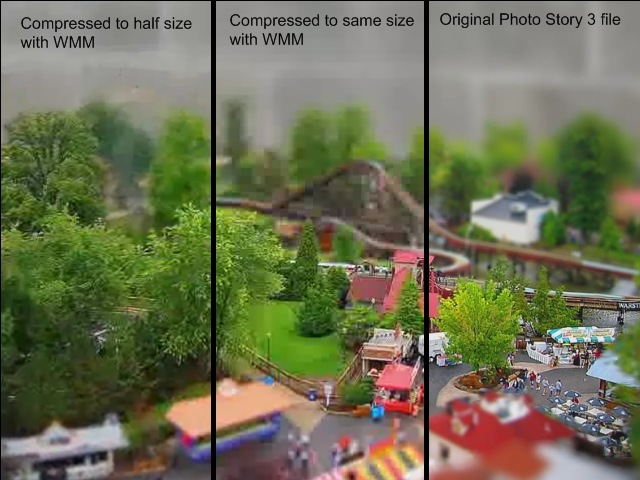
imported into Windows Movie Maker for further compression. Look at the three screenshots from Windows
Media Player below. On the left is a
Photo Story 3 file that has been compressed to half its file sized with
Windows Movie Maker; note the image quality is terrible. In the middle is a is a Photo Story 3 file
that has been “compressed” to roughly the same file sized with Windows Movie
Maker; note the image quality has been reduced noticeably. On the right is the original Photo Story 3
file (640 x 480 res. At 30 fps and 438 kbps).
By collecting the Photo Story 3 Project
File you will be able to publish the file at the desired rate/size.
I recommend using Microsoft
Word as an HTML editor for two simple reasons: people probably already have
Word installed on their computers and they probably are already familiar with
Word. MS Word is considered to be a
terrible HTML editor because its code is extremely bloated (it is VERY
bloated). Word webpages work
surprisingly well in all major up-to-date browsers, however. Considering that even young children can
easily make web pages in Word, I think it is a great choice as a introductory
HTML editor. (See: How-To Create Webpages with MS Word) Word 2007 has a fantastic
“Compress Pictures” tool. Double click
on any picture to bring up the Format ribbon; “Compress Pictures”
Only bother
reading the following if you are interested in understanding what is going on
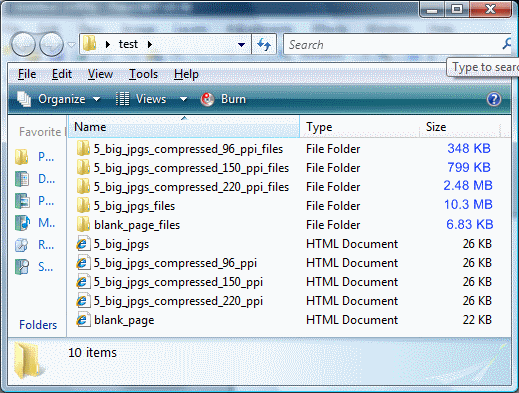
with Word webpages: _files Folders Made by
Word and ppi issues When you
make a webpage with MS Word it creates a folder with the same name plus:
_files. This folder is where it stores
the pictures, backgrounds, WordArt and other webpage elements. Word names these files and creates links to
the parts in the _files folder. When
you copy a Word webpage, Windows automatically copies the _files folder
(Never rename or delete this folder!).
Word is
primarily designed for creating printed documents. Because of this, the default size of an
image pasted into Word will be the ppi (pixels per inch) assigned to the
photo. Photos are assigned a variety
of ppis depending on the camera, scanner or software that created or
manipulated the image. Images also are
usually resized or cropped by the within Word by grabbing a corner and
dragging toward the center. It is
quite possible to have a picture in a Word document or Word webpage that is
over 3,000 pixels wide, but displaying on the page at only an inch or
two. Monitors display at 96 ppi,
however; Word makes a second copy of the image at 96 ppi. For a reason that is beyond me, the larger
image is sent to the browser which must then resize it. (At least this is what my experiments and
tests have shown.) This creates an
inefficiency problem for webpages made with Word because it retains the
original image as well as the resized image.
This makes the webpage file + image folder combination unnecessarily
large, or even huge. Compressing to
220 ppi and 150 ppi deletes the original image after it has been resized to
the desired resolution. Compressing to
96 ppi deletes all but the 96 ppi image. Compressing PowerPoint Presentations PowerPoint
files can be compressed just like Word webpages with the “Compress Pictures”
feature. Another good option is authorGEN/authorPOINT Lite - It’s free and converts PowerPoint
presentations to flash with amazing compression. I’ve seen it compress 200 MB files to under
10 MB! 2008-09 IHM Browser Based Mixed Media DVD Yearbook
Targeted File Space:
* I
expect some categories to come up short and some may be overloaded and plan
on shifting things accordingly. “Class Candids” - 500 MB These are
pages or slideshows for each class or grade level. The lower grades tended to create a file
for each class and the upper grades tended to create a file for each grade
level (since they switch and mix classes more often). 50 MB per grade level K-7 = 400 MB. Eighth grade gets 100 MB of space. IHM has a tradition of including a student
made “8th Grade PowerPoint Slideshow” in our end of the year pep
rally. This file usually runs around
100 MB compressed. “Classes” - 900 MB These are
the students’ personal pages; approximately two MB average per student. In the 07-08 IHM Yearbook, complete class
folders ranged from 12 to 33 MB. We
have 18 homerooms and 440 students.
Combined, these pages required only 400 MB of space. I am hoping that more of my students will
include photos from home on their pages as well as other media files. "Clubs" - 200 MB Animation
Club Art Club Film Club Photo
Club Scrabble
Club Ski Club Student
Newspaper Yearbook
Club Student
Council Church Servers Jr.
Legion of Mary 5th Grade
Flag Band Cantors "Events" - 900 MB Halloween Grandparents’
Day Costa
Rica Exchange Catholic
Schools Week Spelling
Bee 100th Day
of School 8th
Graduation Kindergarten
Graduation Dance Reconciliation First
Communion Confirmation Field Day 8th/Teachers
Volleyball 8th
Clap-out "Music & Shows" - 500 MB While
music is not necessarily the most important subject, it clearly stands out
for entertainment value. Music
Class - Our music teacher filmed each class singing during class. I compressed these files quite a bit
because they are relatively long, but they are a nice addition. Shows and
Plays - We have two school concerts as well as a variety show and a school
play. Church
Choir "Other" - 100 MB School
Staff Church After
Care Index
page Read_me
file “Portraits” - 100 MB This is a
folder of the original school portraits.
It makes a nice screen saver.
Last year I had my sixth graders open each file and copy and paste
each person’s name in white text at the top of their portrait. This also makes a great screen saver and is
a big help for learning names. The
unaltered images for this year total 60 MB. "Scouts" - 150 MB Boys Girls "Sports" - 750 MB CYO
Sports - all types and grades/boys and girls "Technology" - 600 MB This is my
space to include cool technology projects. “Hello”
or “I Love…” videos - Last year I filmed every student in the school saying
“Hello” in a different fashion or language.
I strung the clips from each class together with a half second fade
between. The resulting video for each
class was less than a minute long.
This year I’ve filmed every student in the school saying, “I like”, “I
love” or something similar followed by their choice of one or two things. Music
Videos - Our seventh grade students created music videos about an element on
the periodic table. This was a project
that integrated music, science and technology classes. Desktop
Backgrounds - A collage of all staff and students on one image. Animations
- My fourth graders’ animation projects.
They sing a little ditty and animate a food item. Class
projects - My eighth graders produced “Civil War News Reports” last
year. They chose a major event from
the Civil War and covered it as a TV news reporter would have had TV been
available in the 1860’s. |
||||||||||||||||||||||||||||||||||||||||||||